You set up your Project Zomboid server in two places: under Startup in the game panel and in the server's own settings files.
The settings under Startup
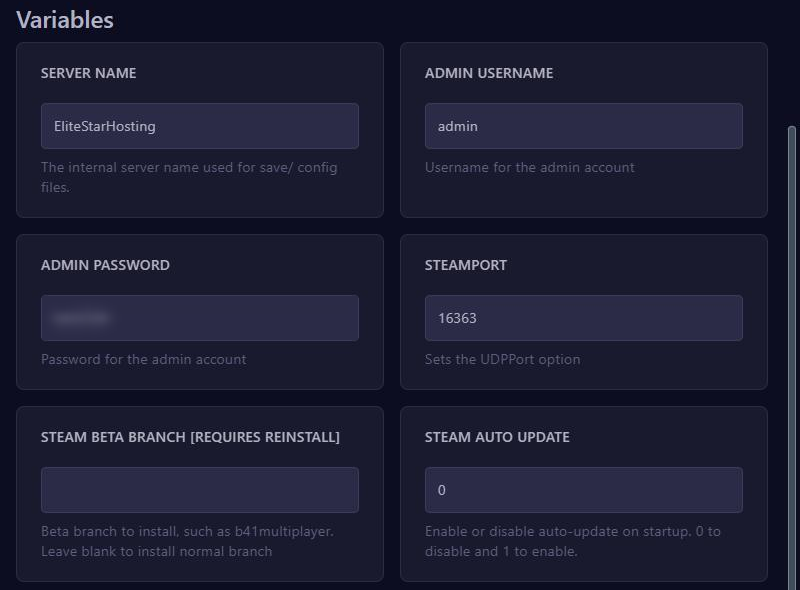
- SERVER NAME: your server's internal name, letters and digits only. The settings files and the world get this name.
- ADMIN USERNAME and ADMIN PASSWORD: the admin account the server creates on its first start. Choose a strong password.
- STEAMPORT: your server's second port. Leave it as it is.
- STEAM BETA BRANCH [REQUIRES REINSTALL]: empty for the regular version of the game.
- STEAM AUTO UPDATE: with
1, the server updates itself on every start.
Don't change SERVER NAME lightly: with a new name the server starts with new settings and a new world. Your old world stays saved under the old name. Players connect with the address and port at the top of your server page.
Where the settings are
Our server starts the game with -cachedir=/home/container/.cache. So what normally sits in the Zomboid folder is in the .cache folder under Files. Below, YOURNAME stands for your SERVER NAME:
Server/YOURNAME.ini: the server settings, such as password, players and mods.Server/YOURNAME_SandboxVars.lua: the gameplay rules, such as zombies and loot.Server/YOURNAME_spawnregions.lua: where players can start.Saves/Multiplayer/YOURNAME: your world.
The files appear on the first start. Stop your server before you change them. See also Manage files.
These are the most important lines in the .ini file:
Password=: the password players need to join.Open=true: players create their own account on their first visit. Withfalse, only players an admin has added can get in.Public=trueandPublicName=: your server in the game's server list, under this name.MaxPlayers=: the maximum number of players. According to the official wiki, more than 32 players can cause stutters.
Mods from the Steam Workshop
Each mod needs two numbers, separated by semicolons:
- Put the Workshop IDs after
WorkshopItems=: the number in the link of the Workshop page. - Put the Mod IDs after
Mods=. They are usually at the bottom of the description. One Workshop item can have several Mod IDs. - Save and start your server. It downloads the mods by itself, and players get them when they join.
WorkshopItems=1234567890;2345678901
Mods=FirstMod;SecondMod
Check that a mod fits your version: many mods exist separately for Build 42 and Build 41.
Build 42 or Build 41
The server installs the current version, Build 42. Want Build 41? Then enter legacy41 at STEAM BETA BRANCH and choose Reinstall Server under Settings. Make a backup first. Players then also pick legacy41 in Steam, and a world from one build doesn't work in the other.
Managing as admin
Log in to the game with your ADMIN USERNAME and ADMIN PASSWORD. Type commands in the chat with a /, or in the console without one:
setaccesslevel "Name" adminmakes someone an admin.servermsg "Restart in 5 minutes"sends everyone a message.kickuser "Name"andbanuser "Name"remove someone from the server.
Stop in the panel sends quit, so the world is saved properly. Server won't start because of No space left on device? Then set BackupsOnStart=false and use Backups in the panel.